Tips on planning and building permits
The preparation of a true-to-scale plan sketch brings advantages in many ways. First of all, you can precisely determine material requirements and costs. During the construction work in the garden you always have an overview thanks to the drawing. Furthermore, the sketch can be used to determine whether or not to apply for a building permit.
also read
- Build a privacy fence out of wood yourself - step-by-step instructions
- Build privacy screens in the garden yourself - this is how it works with prefabricated wooden elements
- How to build a wooden bed border yourself
Many building projects for an imaginative garden design have to overcome the hurdle of obtaining a building permit. Since the regulations differ from region to region, we recommend that you contact the responsible authorities during the preparation phase.
Purchase of materials and tools
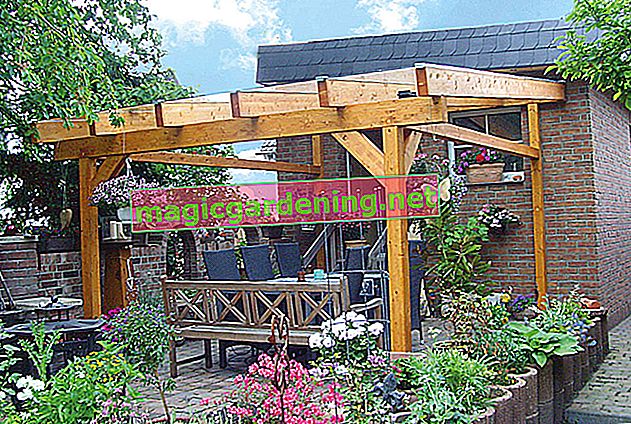
The following list of materials relates to the need for a wooden pergola, which is then equipped with climbing aids for greening with a high level of privacy protection from all sides. We recommend purchasing pressure impregnated wood from a hardware store with a cutting service.
Material:
- Square timber (minimum thickness 10 x 10 cm) for crossbeams and pillars (post length 210 to 220 cm)
- Wooden beams or thick wooden slats as roof rafters
- Screws, bolts
- Mounting plate and bracket
- Rafter anchor
- Post shoes or U-post bases
- Rapid concrete
Tool:
- Cordless screwdriver
- Drill (€ 79.87 at Amazon *) including wood drills
- Handsaw
- screwdriver
- Screw clamps
- Spirit level, folding rule, pencil
Before you start working with the following DIY instructions, please measure the construction site for your pergola. Mark the exact position with cords and wooden sticks. In practice, a distance of 2.50 m or less has proven to be effective for the pillars. Greater distances could negatively affect the statics and should be discussed with a specialist.
Set posts properly - this is how it works
The posts are anchored in a concrete foundation so that your wooden pergola not only protects you from prying eyes in the garden, but also defies storms and rain. Metal post shoes or U-beams also ensure the necessary distance between the moist soil and the wood of the pillars. How to properly concreting the posts in the DIY process:
- Dig a pit for each pillar with the dimensions: 35 cm x 35 cm, at a depth of 80 cm
- Mix rapid concrete with water and pour into the pit
- Insert post shoes or U-beams into the soft concrete and stabilize with wooden strips
- Let the concrete harden
- Attach wooden posts with bolts and screws
- Important: Check the alignment of the pillars with the spirit level
Anyone who values every detail in stylish garden design does not fill the liquid concrete up to the surface of the ground. By leaving a little space, you can spread garden soil on the hardened concrete surface or lay pieces of turf.
Assembling the pergola - how to do it right
The crossbeams are screwed to the pillars using mounting plates and brackets. Since the pergola does not have a roof, thinner wooden slats are sufficient as struts. These are attached to the crossbeams at a distance of 70 to 80 cm with mounting brackets or special rafter anchors.
Since the privacy screen pergola also makes a decorative contribution to the garden design, we recommend lowering the wooden rafters into the crossbeams. This can be done very easily by sawing a 2 cm deep notch in each rafter that corresponds to the width of the crossbeam. The struts are then screwed from below.
Stabilize the crossbeam
If you flirt with a green cover with mighty climbing plants such as clematis or wisteria, a considerable weight comes together over the years. So that the crossbeams can withstand the pressure better, a supplementary support made of squared timber can be used. These are sawn at an angle and screwed on at a 45-degree angle between the pillar and the crossbeam.
Plant the pergola so that it is opaque - tips & tricks
There are various options available to you to green the wooden pergola so that it is opaque. Trellis or trellises can be easily attached to posts and crossbars. As climbing aids for creepers, attach wire ropes with hooks to the crossbeams, which are weighted down with pieces of wood from the waste.
So that your privacy protection pergola in the garden fulfills its task from the first summer, we recommend a plant combination of annual and perennial climbing plants as well as splayers. Short-lived permanent bloomers such as sweet peas (Lathyrus) or morning glory (Ipomoea) bridge the waiting time for honeysuckle (Lonicera caprifolium), wisteria (Wisteria floribunda) and other climbers with a furious sea of flowers.
Once the climbing plants have reached a certain height, fix the tendrils to the ropes or struts with small rings. Elastic plastic cords also offer the shoots a reliable hold when the wind blows stronger.
Tips
This DIY pergola is perfect as a privacy screen for the terrace. This has the advantage that you can green the side walls with privacy protection plants and the roof struts with weatherproof double wall sheets. You can give your creative garden design a floral highlight and don't have to flee from every rain shower.