Things to know about growth
To get started with the perfect pruning of grapevines, we invite you to a short excursion into the botanical basics. The type and extent of the cut can be better assessed if you are familiar with the following aspects:
- Grapevines are climbing, strong-growing berry bushes up to 10 meters high
- Cultivation in the garden and on the balcony requires a climbing aid
- Flowers and fruits thrive on this year's shoots, which come from a long-lasting framework
- Buds are planted in the previous year
- The flowering period extends from mid-May to mid-July
- The hermaphroditic panicles of flowers turn into grape-like berries by autumn
also read
- How can grapevine powdery mildew be effectively combated?
- When is the planting time for grapevines?
- Grapevines even thrive on the balcony - this is how it works
A framework structure made of old wood that is at least two years old is required so that fruit canes can grow. In winter, the gardener selects healthy, medium-thick shoots (6-10 mm in diameter) from the annual wood, which are 10 to 20 centimeters apart on the side of the frame. At its base are the buds from the previous summer, which will bloom and fruit this year.
Types of cuts and dates
Grapevines find their way into the hobby garden as a lone shoot or a small tuft of branches. Pruning takes on a key function so that shapely, high-yielding vines develop from them. The berry bushes have their first contact with the pruning shears on the day of planting. This is followed by a three-year upbringing, which leads to a continuous maintenance phase. The following overview summarizes the recommended types of pruning for decorative and productive growth:
| Cut type | Goal / occasion | best date |
|---|---|---|
| Plant pruning | Selection of main line, prologue for education | on planting day |
| Upbringing | clear education on the trellis | 2nd to 3rd / 4th Year in February |
| Summer cut | Create order, optimize the supply of light for grapes | Mid-June to mid-July |
| Winter pruning | thinning out, promoting fruit wood | February to early March |
| Skimming | break out barren water shoots | Spring to summer |
| Taper cut | Revitalize aged grapevines | Late November to late February |
Cut on the day of planting
The best time to plant vines is from mid-May to mid-April. Before the young berry bushes are up for sale, they have gone through a refinement phase. A noble rice is grafted onto a sturdy base by a skilled hand. When planting it is essential to ensure that the thickened grafting point is at least 10 centimeters above the ground. In the last step of planting, a vine receives its first cut. How to do it right:
- Tie the strongest shoot to a support rod
- Important: also tie the root rod (between the root stock and the grafting head)
- Break out or cut off the remaining shoots
All grapevines are happy about a planting disc with a diameter of 50 to 100 centimeters. At least one plate-sized recess around the root disc should be permeable to water. A mulch layer of leaves, dried grass clippings or bark mulch is very welcome on a freshly planted grapevine.
Digression
Cordon - trellis shape suitable for beginners
Cordon is the progenitor of all forms of trellis for climbing plants. Beginners in the cultivation of grapevines like to fall back on the uncomplicated training option. A cordon is made up of a short trunk, the legs of which you raise horizontally on both sides. Rope systems, lattice structures or simple wires that you stretch between two posts in order to connect the wine rods function as climbing aids. In order to green a meter-high facade, a cordon is directed upwards in layers. The ideal distance between two floors is 60 centimeters.Cultivate grapevines clearly
In the first year, grapevines should develop a long, strong and well woody trunk. Break off further shoots from the processing point. Continuously untie the main shoot so that it just grows. At the end of summer, the future trunk is about pencil thick and two to three meters long. If the chosen form of training does not require a long trunk, cut the shoot back to 100 to 150 centimeters in August. If a long trunk is desired, there is no need to cut back in summer. In February of the following year, the training for the cordon begins, which under normal conditions extends over three to four years. Here's how to do it properly:
- Stick structure with 1 vertical trunk and 1 or 2 horizontal legs
- Scaffold shoots lengthen annually by 7 bud sections, maximum 100 cm
- In the case of floor-to-floor construction, minimum distance between 2 floors: 60 cm
If your vines come from a competent nursery, the first fruit wood forms during the upbringing. Side shoots grow from the buds of the horizontal scaffold branches. Cut these back to two buds the following winter so that they bloom and fruit for the first time. In parallel to the cutting work, you should regularly tie the scaffolding branches and side branches to the trellis.
Winter pruning - step-by-step instructions
At the beginning of the fourth year the education is complete. In February, the starting shot for the annual winter main cut is given. This is primarily aimed at maintaining young, high-yielding fruit canes. How to prune your grapevines in winter:
- Cut back side shoots along the legs to 2 eyes
- Leave one side shoot per knot on the thigh as a fruit shoot
- The ideal distance between two fruit shoots is 10 to 20 cm
- Cut off excess fruit branches at the base
- Cut slightly diagonally so that the sap can drain off easily
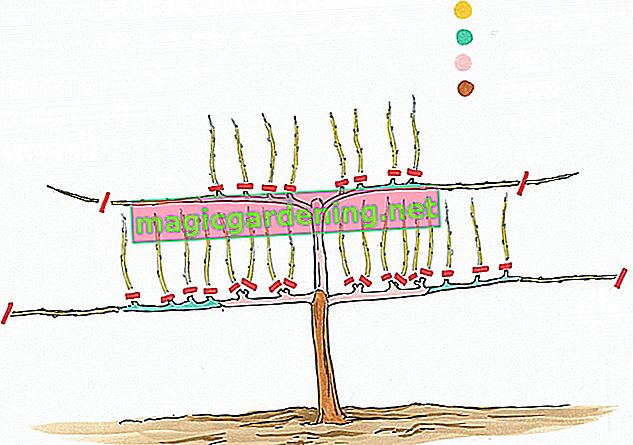
As the illustration below shows, when pruning in winter, give priority to those shoots that are closest to the main shoot or trunk . The proximity to the framework is more important than the direction of growth. It is of secondary importance whether the cut fruit branch points to the left, right or up. All remaining rods that emerge from a knot are cut off at the base, without stumps.
background
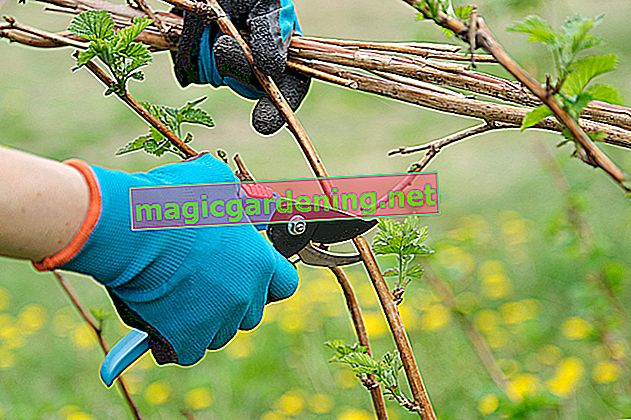
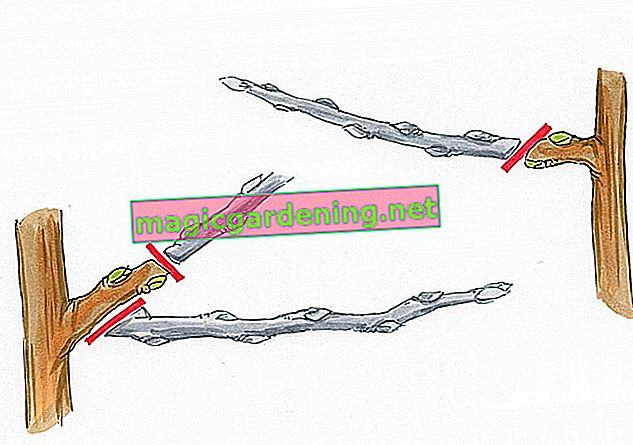
Observe the correct cutting technique
The key to success in pruning is the competent pruning technique. When you raise horizontal scaffold shoots in length or complete the winter fruit wood pruning, the focus is on the buds. Apply the pruning shears close to one eye. Please do not cut into a bud or leave a long stub. A slight incline of the scissors ensures that the sap flows in the desired direction and does not drown any deeper-lying buds.Summer cut ensures order
In summer, the new fruit branches grow from the buds of the tendrils. In parallel with the progress of growth, tie these shoots vertically to the framework. Under normal conditions, 10 to 15 leaves have developed on each tied tail by mid-summer. So much leaf mass is not necessary to supply the grapes. Furthermore, the ever longer, densely leafed tendrils cast shadows on the fruit. In the summer, hobby winemakers use pruning shears again to keep things tidy. How to do it right:
- The best time is between mid-June and mid-July
- Cut back a fruit branch to the fourth or sixth leaf above the last grape
- Shorten non-fruiting and disruptive shoots by two thirds or cut off completely
- The vines defoliate in the grape zone
Fresh tendrils then sprout from the buds below the interfaces. The younger the vine, the stronger the new shoot. So that shoots and leaves do not consume valuable plant energy, they should be removed regularly. If you stay continuously on the heels of the shoots, you can easily break them off in the herbaceous state. It is important to note that a sufficient number of at least four leaves remain above the last cluster.
Break out water shoots and stinginess
You do not need scissors for a continuous measure as part of the incision care. Popular varieties tend to flood numerous pours of water from sleeping eyes in the old wood throughout the season. Furthermore, stinging shoots sprout from leaf axils, as they are known from the cultivation of tomatoes. No flowers or grapes are to be expected from these branches. On the contrary, the undesirable types of shoots deprive the vine of important reserves and want to overgrow fruiting branches in order to reach the light. You can put a stop to this hustle and bustle with the following strategy:
- Regularly remove water shoots from old wood and without recognizable flower roots
- Grasp the woody shoot between your thumb and forefinger
- Break off the shoot from the scaffolding branch while pressing on the side with your thumb
- Do the same with stinging shoots that sprout from leaf axils
From spring onwards, check your vines regularly for water shoots and stinging shoots. With a length of 10 to 30 centimeters, the sterile branches are easiest to remove. If a bullet has escaped your attention and is already lignified, cut it off at the base.
Rejuvenate old grapevine
A vine as a floral ensemble can live for several hundred years. However, this does not apply to individual scaffold drives or legs. Disposals on the trunk structure tend to become more and more gnarled after years. Dense adhesions prevent fresh shoots from sprouting. At this point, local rejuvenation brings new momentum to growth. How to successfully replace an outdated scaffold drive:
- The best time is between the end of November and the end of February
- Cut back dead scaffold shoots onto a 15 cm cone on the main stem or root stock
- In the following years close the gap by raising a strong, horizontal young shoot
- Ideally, older thighs derive from a younger, vital instinct
- Important: derivation cut on short tenons above the fork in old and new wood
Grapevines do not tolerate a rejuvenation cut, as is common practice on other shrubs. It is characteristic of vines that the trees and shrubs hardly form wound wood to cover cut surfaces. The massive flow of sap also contributes to the fact that large cuts do not close or close slowly and wound closure agents do not adhere. Putting an old grapevine completely on the cane usually ends in total failure.
frequently asked Questions
Are grapevines self-fertile?
Grapevines are usually self-fruiting. A single plant is enough to harvest juicy grapes. The crop yield increases noticeably when you socialize two or more grape varieties.
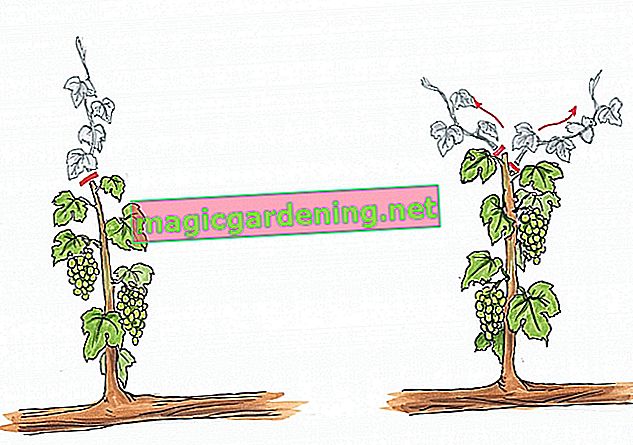
I have acquired a vine with three shoots that I would like to raise up to the balcony with a single trunk. What is the best way to proceed with the pattern training?
Select the strongest shoot and tie it to a support rod. Cut back the other two shoots at ground level. When the remaining shoot has reached the planned height, let it grow another 50 centimeters. Then cut the trunk in half. Apply the scissors just above one eye. From this point on, the grapevine will branch out and can be trained as planned.
If I plant vines for wall greening in the tub, how big should the container be?
A bucket should always fit the size of the plant. Therefore, consider in advance how far a grapevine can spread. The sizes for suitable tubs therefore range from 20 to 50 liters. If you are planning the greening of a pergola or a majestic facade, it may be a little more volume. It is important that the root can develop unhindered in order to supply the leaf mass.
Our house facade is green with magnificent vines and is now to be renovated. How can the vines survive this?
The best option for solving the problem is moving the vines. Thoroughly thin the vines to reduce the plant mass. Then loosen the tendrils from the climbing frame to lay them on the ground. It is amazing how flexible even thick logs are and how easy it is to fold them down. Ideally, a temporary trellis will be available until the renovation work is complete or you can simply fix the tendrils to the scaffolding.
We would like to raise our new grapevine in a fan shape. What do you have to pay particular attention to?
In contrast to the one to two-armed cordon, the fan shape usually has five legs. First, raise the trunk to a height of 50 to 60 centimeters plus five buds. Above the fifth bud, shorten the main shoot. This creates a sap jam that ends in the shoot of five side branches. Remove further shoots from the grafting point to compete with the trunk, as well as excess side shoots. To create an airy, elegant fan, fix the individual legs on the trellis at a distance of 50 to 60 centimeters.
We would like to green our 80 cm wide pergola with grapevines. How does it work?
First guide the trunk wood of the grapevine upwards. Once at the top, raise the scaffolding parallel to the spar and tie the tendrils regularly. You leave a side shoot every 10 to 15 centimeters. Shorten these side shoots to 2 eyes every winter. A stable structure is achieved if every year between 3 and 6 new side shoots are added to the horizontal trunk extension.
Should I prune my vines in fall or spring?
Vines are in the juice early and can “bleed” profusely from cuts. It is therefore advisable to carry out the pruning of grapes while the juice is resting. The best time for the main pruning is immediately after the main frost period in February. You can prune grapevines in the fall. However, there is a risk that the tendrils will dry out or freeze completely in winter.
My grape “Lakemont” has grown beautifully and already has small grapes on both of its branches. I would like to raise the vine horizontally on our house wall. How do you do that?
The good-natured pruning tolerance of grapevines allows a wide range of upbringing options, including the horizontal green facade. When you cut off a tendril, new side shoots will sprout from 10 to 20 centimeters below the cut. You attach these to the trellis according to your own ideas. The only premise is a sufficient distance of about 50 centimeters. At the end of February cut the side shoots to 2 buds. At the end of June, shorten fruit stalks one to five leaves above the last grape. On this occasion, remove offending and barren branches. In August, be on the lookout for leaves that shade a grape to remove.
The 3 most common mistakes
The frustration is great when grapevines turn into an impenetrable undergrowth. There is no trace of the longed-for grapes far and wide. Equally devastating for the hobby winemaker when an ancient grapevine dies after the rejuvenation cut. To save the readers of this tutorial from such disappointments, the following table lists the three most common cutting errors with tips for successful prevention:
| Cutting errors | Damage | prevention |
|---|---|---|
| no parental cut | uncontrolled, confusing growth | Raising a grapevine as a cordon |
| never exposed | dense, impenetrable network of rods, few flowers and fruits | prune vigorously every February |
| old grapevine put on the stick | Total failure | locally rejuvenate old grapevine |
Tips
Every vine root is unique. If a vine is exhausted after many years, do not throw away its roots. With a little imagination, you can use the bizarre root strands for a sensational decoration. Simply attach a piece of floral foam to it and decorate it with seasonal flowers - and your unique specimen is ready.