Origin and Distribution
Only since the early 2000s has the Zamioculcas experienced an upswing as an uncomplicated houseplant. Previously it was simply not cultivated for this purpose, even if the species was discovered and described as early as the 19th century. The home of the plant belonging to the Araceae family is Central and East Africa, where the species is widespread, especially in Kenya, Tanzania and Zanzibar. There the plant grows mainly in the wooded foothills of the highlands and in lowlands where rocky subsoil predominates.
also read
- Zamioculcas is satisfied with uniform soil
- Zamioculcas gets brown leaves - causes and countermeasures
- Zamioculcas prefers a bright location
By nature, the Zamioculcas is used to extreme drought and can go weeks to months without water. The alternation between dry phases and heavy rain is typical for the home region, during which the plant can quickly soak up moisture - and then survive drought again.
use
The Zamioculcas can only be kept as a houseplant or in winter gardens, because as a warmth-loving, typically African plant, it should not be exposed to temperatures below 16 ° C. The plant feels most comfortable at temperatures from 20 ° C and, due to its resistance to drought, can also tolerate summer heat and winter heating air without any problems. During the warm summer months, you can also place the plant in a partially shaded or shady spot on the balcony or terrace, provided that the temperatures do not drop below 20 ° C at night. In addition, it should be dry so that the Zamioculcas, which are very sensitive to excess moisture, are not exposed to continuous rain.
Appearance and stature
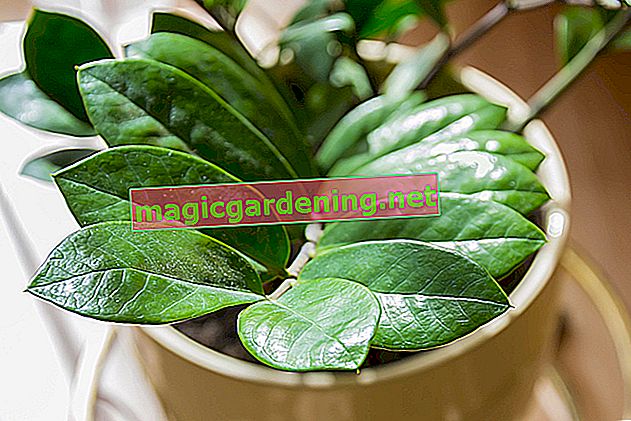
From a botanical point of view, the Zamioculcas is one of the herbaceous plants which, however, does not correspond to its actual appearance. The evergreen lucky feather develops thick, fleshy rhizomes underground, from which thickened leaf stalks sprout and can grow up to a meter high. These petioles are the actual leaves of the Zamioculcas: They are club-shaped, thickened and covered with numerous stiff, strong pinnate leaves. All above-ground parts of the plant are colored glossy dark green and are a good indicator of the brightness of the location: the leaves turn an intense dark green in darker locations.
Overall, the plant looks strong and, with increasing age, it develops quite dense shoot growth, which is why occasionally dividing the rhizome is a good idea: This not only gives you a second plant, but also prevents the plant pot from being blown up by the pressure of the roots. Basically, the Zamioculcas grows rather slowly, but can be several decades old and therefore very large.
Blossoms and flowering period
A Zamioculcas kept in indoor culture only very rarely produces a flower. However, this is unspectacular anyway: As is typical of the arum family, the flower consists of a thick, whitish bulb only a few centimeters high. You may only be able to enjoy a bloom if the plants feel completely at home in their location and optimal conditions are available. To do this, however:
- permanently around 25 ° C ambient temperature
- the humidity is neither too high nor too dry (such as in heated rooms in winter)
- a bright but not full sun location was chosen
- is regularly fertilized and watered
- Care was taken to ensure a sufficiently large pot
- the plant is not too moist
- a high quality compost-based substrate has been filled
The flower shoot, like the leaf shoots, also grows directly from the rhizome, but becomes a maximum of 30 centimeters high. Initially, a bract covers the flower, but after it has sprouted it kinks and exposes the white bulb. This in turn lasts a few weeks before it dries up and turns brown. The possibly formed seeds can basically be used to propagate the Zamioculcas, but this is a difficult and hardly successful undertaking for the layman.
Toxicity
Like any arum plant, the Zamioculcas is poisonous to both humans and pets. The evergreen plant contains skin-irritating substances such as oxalic acid and calcium oxalate, which externally can lead to swelling and reddening of the mucous membranes and skin. However, poisoning is very rare, as the effect in the form of a burning mouthfeel etc. sets in immediately and the body is therefore warned in advance. Just make sure that no sap gets into your eyes when pruning, for example, as this can be very uncomfortable. In this case, rinse the eyes thoroughly with clear, warm water. A doctor's visit, however, is usually not necessary.
Which location is suitable?
In terms of its location, the Zamioculcas is gratifyingly frugal. Basically, the plant can cope with any space, as long as it is not at a south-facing window. The easy-care houseplant cannot stand full sun, but still feels most comfortable in a bright spot. If there is no such thing, simply put the “Zamie” in the shade - it copes well even with little light, but then grows much more slowly and develops noticeably dark foliage.
Anyway, warmth is more important than the light intensity, because the Zamioculcas shouldn't be cooler than 16 ° C. Temperatures between 20 and 25 ° C, which the plant can enjoy on the balcony during the warm summer months, are optimal for its growth.
Continue reading
Substrate
Commercially available standard soil, which can be pre-fertilized, is sufficient as a substrate. The lucky feather is also suitable for green plant, indoor plant or palm soil. The houseplant feels most comfortable in soil with a high proportion of compost. For better permeability, mix in clay granules or perlite (€ 32.90 at Amazon *) into the substrate. Be careful not to keep the plant too moist - if the substrate becomes moldy, the “Zamie” is too wet and needs a new pot and fresh substrate as soon as possible. If you prefer hydroponics instead of soil cultivation, the already low maintenance effort is reduced even further.
Plant Zamioculcas correctly
If you have bought a new Zamioculcas, it is best to transplant it into fresh substrate. You can tell whether the plant needs a new pot by the roots in the container: If there is hardly any space left, it is time for a larger container. This should be as wide as possible, because the roots mainly expand in width. A drain hole on the bottom of the pot is also essential, through which excess water can drain off quickly. To prevent it from silting up, cover the bottom with a layer of potsherds. Adding expanded clay (€ 17.50 on Amazon *) or perlite ensures better permeability of the substrate.
Pour the zamioculcas
The Zamioculcas store moisture in their fleshy, thick leaf stalks, which they use to survive dry times in their East African homeland. This makes it a succulent plant that only needs to be watered a little - but must still not dry out all the time. Always water the “Zamie” when the substrate has dried well - you can determine this with clay pots using the “knock test”. Gently tap the pot with your knuckles. If the resulting clay sounds hollow, it's time to pour. Use well stale, room temperature tap water or collected rainwater. Excess irrigation water should be removed promptly.
From time to time you put the Zamioculcas under the shower and rinse them off with a gentle, lukewarm shower jet. Showering kills several birds with one stone: On the one hand, you remove accumulated dust from the leaves and, on the other hand, you increase the humidity so that pests such as spider mites do not stand a chance when it is dry.
No specific information can be given with regard to the pouring amount. Basically, the Zamioculcas needs more and more water during the summer months than in winter. How much and how often you actually water depends on the brightness at the location, the ambient temperature and the size of the plant.
Continue reading
Fertilize Zamioculcas properly
Like any potted plant, the Zamioculcas also depend on a regular supply of nutrients. Fertilize about every four weeks with a low-dose, liquid green plant fertilizer that is given together with the irrigation water. Alternatively, you can also provide the plant with a long-term fertilizer in spring - in the form of a stick or cone, for example - so that fertilization cannot be forgotten during the summer months. Stop fertilizing during the winter.
Plants freshly potted in pre-fertilized soil should be fertilized after eight weeks at the earliest, just like specimens infected with pests or sick specimens that are only supplied with nutrients again after they have recovered. Plants are like humans in this regard: you probably eat less if you're in bed with a feverish cold.
Continue reading
Cut zamioculcas correctly
Even if the lucky feather grows slowly, it can become quite high and above all extensive over the years. Nevertheless, do not cut back the plant, otherwise unsightly bald spots will remain. The Zamioculcas does not sprout from the stump, it often remains for several years. Instead, simply split plants that have grown too large.
Sometimes you have to use a knife or scissors anyway, because sick or dead shoots must be removed as quickly as possible. Cut off dried up or rotting leaf stalks directly at the base and ideally dispose of the clippings with household waste.
Continue reading
Divide and repot
You rarely need to repot the Zamioculcas; in contrast to many other potted plants, the lucky feather likes to stand in cramped pots and only needs a new one when its roots threaten to grow out of the planter. Usually this happens every three years or so. On this occasion, you can also divide large plants into two or more individual plants and plant them separately. This is the quickest and easiest way to multiply the attractive plant. The best time for this measure is spring, and you should water the plant (s) more intensely for a few weeks after repotting.
Zamioculcas propagate
Furthermore, the lucky feather can be multiplied by leaf cuttings, which you simply put with the cut side down in a pot with potting soil, keep the substrate always slightly moist and place the container in a light place about 25 ° C. It is best to cultivate the cutting in an indoor greenhouse, since roots form more easily when the air is buffeted. However, until the leaf has actually taken root and a new shoot develops, you need a lot of patience: this process can take up to a year. Even after that, the new plant grows very slowly. In addition to individual leaflets, petioles up to 20 centimeters long with several leaflets are also suitable for reproduction.
Continue reading
Diseases and pests
The Zamioculcas is a robust houseplant that rarely gets sick or infested by pests. Basically, the only problem is spider mites, which often occur in dry and warm locations. You can keep this plague off your neck by showering the plant occasionally.
Zamioculcas gets brown leaves, what to do?
If the Zamioculcas suddenly get brown leaves, there are usually mistakes behind them. Find out if you can
- pour too much or too little
- fertilize too much or too little
- the ambient temperature is too high or too low
- the humidity is too high or too low.
As soon as the cause has been determined, take appropriate countermeasures.
Zamioculcas gets yellow leaves, what to do?
Yellow leaves on the lucky feather, on the other hand, are a clear indication of a location that is too damp. In this case, immediately repot the plant in fresh, dry substrate and cut off any rotten roots or leaf shoots. Pour the Zamioculcas less or less in the future.
Tips
The leaf stalks can be a meter long and sometimes even longer. To prevent them from hanging over or even kinking due to their own weight, you can tie them up with a bast band or something similar to stabilize them.
Species and varieties
Basically only one variety of Zamioculcas is commercially available, although a variegated variant can also be admired in the Botanical Garden in Berlin. However, this is only rarely and can then be purchased for a lot of money. On the other hand, it is doubtful whether the black Zamioculcas 'Raven' that is occasionally offered is actually an independent variety. The very dark leaf stalks and leaflets of this variant are actually developed by every normal lucky feather - as long as it is dark enough. A dark location and thus little light automatically lead to dark colored leaves in this species.

