Why dismantle the hedge trimmer?
There are various reasons to dismantle a hedge trimmer (€ 135.56 on Amazon *). If you want to thoroughly clean, oil or sharpen your hedge trimmer, you should remove the cutting blades. To do this, the hedge trimmer must be screwed on. However, you only have to remove a few parts here. Completely dismantling the hedge trimmer only makes sense if you are curious and want to get to know your hedge trimmer from the inside. Repairing a hedge trimmer yourself is a courageous but hardly promising undertaking. You would have to have a lot of knowledge to get a satisfactory result here. If your hedge trimmer makes noise or does it run slowly, this may be because the cutting blades are dirty. You can very well remove and clean these yourself.
also read
- Sharpening hedge trimmers: a guide
- Have the hedge trimmer repaired or do it yourself?
- Maintaining a hedge trimmer
What should be considered when dismantling the hedge trimmer?
Disassembling a hedge trimmer is not difficult. However, you should note the following:
- Remove all power before you put your hand on your hedge trimmer. Remove the battery or spark plugs or disconnect the hedge trimmer from the power.
- Wear gloves when working with the cutting blades!
- It is imperative that you follow the order in which you disassemble the hedge trimmer. Prepare several small containers in which you put the screws and small parts that you take out one after the other. Make sure you make a note of where what belongs!
- Tighten the screws sufficiently when assembling.
- Oil the gears as well as screws and cutting blades at the same time and clean the inside as best you can with a rag and some oil.
Step by step dismantle the hedge trimmer and remove the cutting blades
- Gloves
- screwdriver
- stone
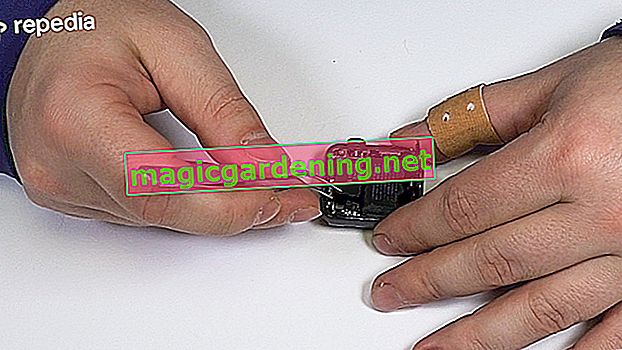
1. Preparation
Put on gloves. Turn the hedge trimmer so that the base of the housing is facing up. Support the cutting blades on a stone high enough to prevent the hedge trimmer from tipping over.
2. Screws
Loosen the screws on the underside of the housing and remove the gear cover.
3. Remove parts
Remove the connecting part between the gear wheel and the knife blades as well as the seal (usually colored) between the two fastening screws.
Now loosen the two fastening screws. Now you can remove the knife blades and clean, oil or sharpen them.