Materials needed
You will need the following materials for the water feature described here:
- a tub or something similar made of plastic or another hard-wearing material (no wood!) and with a lid
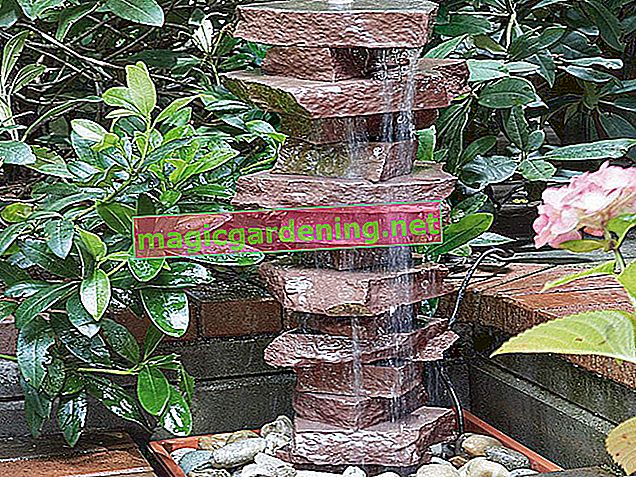
- a pierced stone for the water feature
- a submersible pump with garden hose and power line
- possibly aquatic plants including a plant basket, (14.11 € at Amazon *) pond fleece and potting soil
- possibly plants (shrubs or grasses) for the integrating planting next to the water feature
- possibly paving stones or similar for the integration of the water feature on the terrace
- Pebbles, basalt and other stones of different sizes for decoration
also read
- Build a bamboo water feature yourself - that's what you need
- Build a Japanese water feature yourself - you need these materials
- Modern terrace design with water feature
preparation
Before starting the installation, the first thing to do is to carefully choose the location. This is important if only because this water feature is dug in and can therefore only be moved with difficulty later. A place near the terrace or some other seating area would be ideal so that you can have a look at it and really enjoy the calming effect of the water. The ground should also be reasonably level and offer enough space to dig in a drip tray.
Build a water feature
Once you have found a suitable location, you can get to work with a spade, shovel and pickaxe.
Install catch basin
To do this, first dig a suitable hole for the water catchment basin:
- Turn the basin over and place it with the opening facing down in the desired location.
- Now surround it with sand: This way you know how big the opening to be digged has to be.
- Dig the hole deep enough so that the basin is flush with the edge of the earth.
- Preferably a few centimeters deeper to create a secure foundation with sand.
- This is much easier to distribute than normal soil and thus gives the vessel the necessary stability.
- Use a spirit level to ensure that you are standing straight.
- This is important so that the water pump does not later stand crooked and run out of true.
- The sand foundation and vessel are now in the hole.
- Fill the vessel to the brim with water.
- This is important, because the walls of empty plastic vessels give way when the earth around them is poured in and tamped down.
- Make sure to put the lid on so that as little sand as possible falls into it.
- Now you can fill in the soil on the sides and tamp it down.
- Now integrate the ensemble harmoniously into the surroundings, for example by paving and / or planting.
In addition, you can now cut suitable holes in the lid for stones, plants and cables / hoses. A jigsaw (€ 71.15 on Amazon *) does a good job here.
Install water feature
Possibly desired aquatic plants are planted as follows: Fill a planting basket with pond fleece and potting soil, put the plants in there, fold the ends of the fleece over the earth and weigh it down with pebbles. Water thoroughly. The planter is embedded in the water trough, on a base of one or more base plates, so that it is only about ten centimeters deep in the water. The pump is also placed on such a stone so that it does not suck in dirt.
However, think carefully about whether you actually want to use plants or whether you would prefer to plant them next to the water feature: In winter, the water must be drained because the installation is not frost-proof due to the low depth. Now put the lid on so that it fits perfectly so that plants and tubes can be fed through the pre-drilled holes. Then install the water feature stone: attach the hose to the pump and run it through the stone. Secure the end protruding from the stone with thick electrical tape so that the water cannot run back into the stone
Decorate the water feature
Rinse the decorative stones thoroughly before laying them so that the dirt does not get into the water and thus into the pump.
Fix the water feature stone with large stones so that it does not tip over and cover the lid with decorative stones. This should then no longer be visible. Now the water feature only has to be connected to the electricity. A trial run shows whether it works as desired.
Tips
Do not use a pump that is too powerful, as the water must not be sprayed outside the trough. It has to stay in a steady flow, otherwise you have to keep topping up with water.